Showing posts with label Gift Wrapping. Show all posts

Wednesday, December 21, 2011

Magazine Cover Christmas Present Bow

Are you about to run out the door to your holiday party with a naked gift?  Did you wait until the final hour before wrapping and then discover that  you had no bow and  no ribbon to make one?  Did you frantically google "last minute gift bow" and arrive here?  If you did, I hope this post will be helpful.


Last night I was in the same situation.  On Sunday I was leafing through a box of old Christmas magazines. I thumbed through them and ripped out anything I thought I might use (like a recipe) and threw the rest of the mag in the garbage. I hated to part with some of the beautiful covers, so I ripped them off before tossing the magazine. 

Last night when I needed a bow, my eyes landed on the three covers still lying on the coffee table.

Inspiration struck!

A glue gun and 15 minutes turned the magazine covers into a nice full bow for my gift.
I think it's fine just the way it is. But since I had a  real greenery centerpiece nearby,  I cut off a few sprigs of soft greens and stuck them in to cover some of the lettering.
My gift is naked no more.  If you cannot figure out how this bow was made, just click on my gift wrapping label on the right side of my blog and you will find the directions I gave a few days ago to make this type of bow.

Monday, December 5, 2011

Grocery Bag Gift Wrap with Denim Bow

Who would guess that an old grocery bag and a few strips cut from a leg of jeans
would turn into this cute gift wrap?
I used the bag handle for the to/from tag. The center gold ball is one that broke off some sprigs I used elsewhere. 

The bow making method is the same as the one I showed a couple of days ago, except I did not use a round circle base. I wrapped a piece of denim around the package
and just hot glued the bow pieces to it.

I think it would be a cute wrap for a piece of jewelry for a teenager or for any small gift for a crafty friend.

No need to purchase expensive wrapping paper if you still have a grocery store that gives you brown bags.

Friday, December 2, 2011

Wrapping Paper Bow How To

Have you ever needed a matching bow for your gift or just wanted to make your own wrapping paper bow?  I make them almost every year.  Tonight I wrapped my first gift and made my first bow.
I could have just used a purchased bow like this:
But I think my homemade wrapping paper bow is much more interesting and it is super easy to make from wrapping paper.  I had a small section of the base paper left that I cut off the sides of my gift package.

Then I cut a few strips of green foil paper. Don't worry about being exact. My strips were all different widths. You can adjust the size later. 


You need a circle to begin the bow.  I just ripped off the top of a cardboard ribbon holder, but you can draw and cut one out of a cardboard box to whatever size you need if your gift is bigger.

Cut the strips as long as you want them to be when folded over. Then take out your trusty glue gun and glue the bottom shut, then glue the piece on the circle as above.
Mine ended up like this.  Then I did a second slightly shorter layer of the base paper and stuck them between the open spaces. I did 4 layers total, alternating the paper color.

The fun part is finding something of interest to finish off the top. I used a walnut (painted silver)
Then I glued on a gold star to finish off the bow.

Turn it over and put a good amount of hot glue on the bottom circle and position it where you would like it on the package.


Ta da!


Now don't you think that is a more interesting package than the one with the little purchased bow?  It's also a great way to use up leftover wrapping paper.

I have blogged about a  few other bows I've made. If you want another idea or two look under my "Gift Wrapping" label.

Tuesday, December 14, 2010

Gift Wrap #2 -- Who says Bows Can't be Manly?

I have had this big buck wrapping paper for years. I decided this would work nicely for my second exchange gift for the family party. 


This paper should give the guys an indication that this gift is for them. I made another (smaller) bow with green velvet, brown cotton  and a pine cone center. As bows go, I think this one looks pretty manly.

Monday, December 13, 2010

Making a Big Bow for a Dull Gift

OK, here is the dull gift again--I picked the dull gold paper on purpose so I could use whatever colors of ribbon I had on hand for the bow. It's like dressing yourself. If you have a monotone dull color on, you need to punch it up with big jewelry.


I definitely needed some big jewelry for this one. None of the  premade bows I had were big or interesting enough. So I decided to make my own.  It probably will come as no surprise to most of you that I have a bin or two of ribbons/etc. for gift wrapping--all of which I have purchased for a fraction of their full price.  I went to the basement and  grabbed a few spools of ribbon that I thought would work.   I decided to just cut pieces and staple/glue them down to a circle of scrapbook paper. I traced around a coffee cup to get the circle.


 It did not take long for me to realize that this bow needed a heavier base. I was holding an empty ribbon spool in my hand.......hmmmm...why not just use that...it's very sturdy.

So I began gluing ribbons on to the empty spool.  I forgot to take a pic until I was already half done.  This is the back side after I had already glued a dozen or so pieces of ribbon on.
I just cut ribbon and glued until I had it pretty full.
...pretty full and too flat!  I dug around the bin for more ribbon and found a pretty green wired ribbon that worked great.
I put more of the green ribbon on top of the gold ribbon that I had already wrapped around the box.  Then I hot glued the bow onto the gift.  Now I just needed to find something to fill in the top. Sitting on the table right next me were some gold pine cones.  I grabbed one that sat perfectly in the open space. I squeezed out a big gob of glue and affixed the cone.

There my first gift is wrapped and I don't think it's dull anymore!

Tomorrow I will show you a "manly" gift wrapped package with another similar bow.

Sunday, December 14, 2008

Wrapping Paper Pinwheel Bow


I was looking through my Christmas binder today

(What? You don't have a Christmas binder?) and I came across a gift wrap idea that I had saved from last year.

I do believe it's from Martha Stewart.

It's very easy to do and I thought maybe some of you might like the directions to make one of your own. So I photographed all the steps.

There are a lot of steps, but really it only took about 15 minutes and that included taking all of the pics.
Step 1. Wrap the package.

Step 2. Take a matching piece of gift wrap and cut it long enough to go around the center of the package. The width will depend on how large your package is. Mine was pretty small so I cut it about 4 inches wide.


Step 3. Fold both sides in to the center.

Step 4. Wrap the band of wrapping around the gift and secure with tape on the backside.

Step 5. Cut a square of the wrapping paper and the band paper the same size. The size of the square will depend on how large your package is. I cut about a 4-inch square for my small package.

Step 6. These two pieces need to be glued as one piece. Instead of glue, I used some iron-on interfacing. It worked great. If you don't have this, just use glue and wait until it dries to go to the next step.

Step 7. Fold the square twice, to look like this.

Step 8. Cut on the 4 lines created by the folding to about 1/4-inch from the center. Make sure you stop the same distance from the center on each cutting line. Don't cut all the way through!

Step 9, Fold every other point over to the center. Tape each one down.


Step 10. Glue something in the center to cover the tape. I used a jingle bell.

That is all there is to it! You now have a beautiful package with a bow that cost next to nothing. Have you ever bought a single nice bow? They are not cheap. And they certainly are not unique and made with love as this one is.

Have fun and if you make one, I would love to see it! Leave me a comment so I can go to your blog to see it.


Tuesday, December 4, 2007

Wrapped Gift Boxes to Match the Tree

I got home a bit after 5:00 pm today. It is now 8:36 p.m. and I just got off the telephone! I talk on the phone a lot at work and really hate to talk on the phone at home. My mother called both of my sisters to find out if they knew why my line was busy for so long. She was just about to come over to see if I was O.K. when I called her.

I have been calling to invite everyone to my Christmas festivities.

Christine, if you still read my blog, I hope you got your email invitation! We can't drink slushes without you! This year I am planning on two different kinds--Pineapple Paradise and Christmas Cranberry.

I am having back-to-back parties on Dec. 23 and Dec. 24. The 23rd will be only 10 people and I think I will be doing a Soup Buffet. On Christmas Eve I will be doing my family party and will have at least double that number. That will be a heavy appetizer party.

I will have such fun planning everything!

I had my nails done after work. I am so into snow now that I had a snowflake painted on one nail.


Any way on to my gift wrapping adventures:

Foil gift wrap is not very photogenic. I have been trying to get a decent photo of these boxes for three days. I guess these are as good as it's going to get.

I like to use these computer paper boxes for the more fancy gift wraps. Then I make a big bow from the wrapping paper and the ribbon I used. These boxes do take a bit of time, so I only do them for the more special gifts or if I am going to use them as decorations as I am here.

Last Christmas I did a "how to" post on making gift wrapped bows, so I am not going to repeat it here. If you want to know how, just click the "Christmas" category and look for the post in 2006. There are step-by-step directions. I guess you could also type "gift wrapping bows" in the search box and see if it comes up.

I will eventually use these boxes as gift receptacles. I just haven't bought any gifts yet, so they are all empty. It's so nice to have prewrapped boxes so that when I get the gift, I can just put it in an awaiting box. Of course, it does not always work out. At least half the time, what I buy is too big for the box.

This is the finished box:


I used some of the gift wrapping paper as well as the ribbon on the front. Then I tied a big silver heart into the bow.


I did a second box and used some gold stars and silver walnuts in place of the heart.
I have a bronze gift bag with a silver star hanging from it and two smaller shirt boxes in a non foil paper.

It is very difficult to see them in these pictures as the foil reflects the light. Hopefully, you get the idea.

Tuesday, December 5, 2006

Stop! Don't Toss Those Wrapping Paper Scraps!

Turn them into a bow instead.
When you wrap a package, are you left with lots of little pieces that are just a bit too small to wrap another gift?


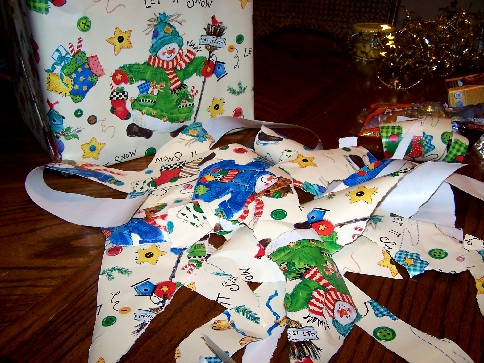
Instead of tossing them, tear them into strips. Don't cut with scissors because you want the unkept edges--that's the designer look. :) Different lengths are fine -- anything from about 6 inches to 18 inches. You will need more longer strips than shorter. The longer go on the bottom, the shorter on top. Tear yourself a nice big pile of them--at least 24 pieces for a big box.

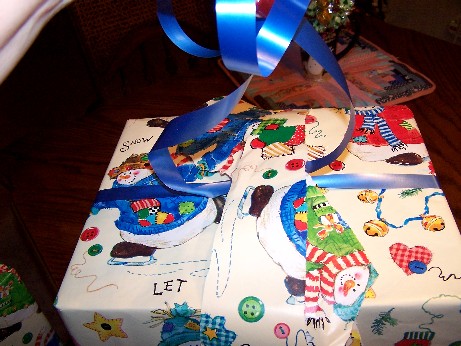
Take some ribbon and criss-cross it across the top of the package securing it well with tape on the inside of the lid. Take another long piece of ribbon (about 2 feet and put it underneath the center of the ribbon. Take a knot to keep it in place.


Take about 6 pieces of the longer wrapping paper strips and lay them across the package top somewhat centering them over the knot. Don't take extra time to make sure the strips are perfectly centered because it does not really matter.


Tie the ribbon once, but not in a knot this time. Pull it tightly. This will cause the paper strips to lift up. That's a good thing.

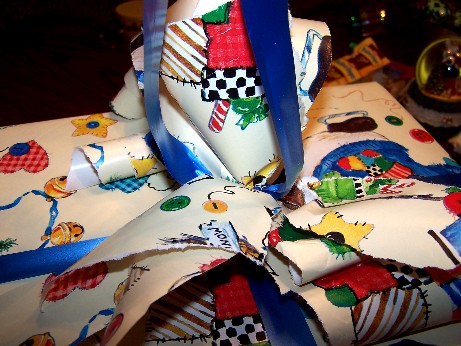
Now take the edge of a pair of scissors and curl the paper just like you would curling ribbon. You will use your left hand to hold the bottom of the strip of paper (I had to use mine to take the picture). The paper will tear easily, perhaps causing a cuss word or two to escape your lovely lips. Don't stress over it. Just curl what's left, if it's long enough, otherwise leave it there and move on. I you rip every piece, then go ahead and start stressing, 'cause you won't have anything left to make the bow! :(

Add another layer of strips and repeat all the above steps. You will need a minimum of 4 layers for a large bow. Just keep adding until you are happy with the size of the bow.


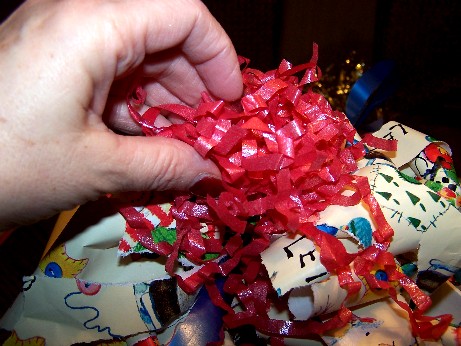
After my last layer I added a small handful of this paper shredding stuff for a little accent color. Just plop it in the middle and tie it the same as the other paper. I also cut another piece of blue ribbon and tied it in at the same time. Curl the ends of the blue ribbon.


Voila!

A custom bow for your package.

I learned how to do this years ago from a lady who owned a gift shop. She made these boxes up and sold them in her gift shop. I have done MANY different things with this over the years. I've used leftover wallpaper for a very sturdy package, tied all sorts of little thing into the bow--toys for a child package, sticks and pinecones for the natural look, bridal tule, beads, etc. You're only limited by your imagination.

Notice how long this post is with nine pictures that I had to upload? Last night it took me over an hour to write. Just as I was about to post it, IT DISAPPEARED during another Blogger burp.

I had to redo the WHOLE THING this morning.

The moral is: remember to save as a draft frequently or the same may happen to you!

Related Posts Plugin for WordPress, Blogger...